 Blog
BlogWhen it comes to enhancing the interior of your home, residential drywall installation is one of the most important steps in creating smooth, professional-looking walls and ceilings. Whether you are building a new home or remodeling a space, drywall installation for homes provides a clean, uniform surface ready for paint, wallpaper, or other finishing touches. While it may seem straightforward, the process requires careful planning, proper tools, and skilled execution to ensure lasting results.
Understanding the Basics of Residential Drywall Installation
Drywall is more than just sheets of gypsum plaster sandwiched between paper layers. It is the foundation for your interior aesthetics and plays a significant role in soundproofing and insulation. Homeowners often overlook the importance of precision during installation, but even minor errors can lead to visible seams, uneven surfaces, and time-consuming adjustments later.
When preparing for drywall installation, it is essential to measure your walls accurately and select the correct drywall type. Standard sheets typically measure four feet by eight feet, though longer sheets are available for high ceilings. Moisture-resistant boards are recommended for bathrooms and kitchens, while fire-rated drywall is ideal for garages or utility areas.
Preparing the Space for Installation
Proper preparation is critical before starting any residential drywall installation project. Walls and ceilings must be framed securely with studs spaced correctly to support the drywall sheets. Electrical wiring, plumbing, and insulation should be installed first to avoid complications during the installation.
Clearing the room of furniture and protecting floors with drop cloths will make the process smoother and reduce the risk of accidental damage. Homeowners can also pre-cut openings for outlets, switches, and vents to save time. A well-prepared workspace not only speeds up installation but also minimizes the chance of errors that can affect the overall finish of the walls.
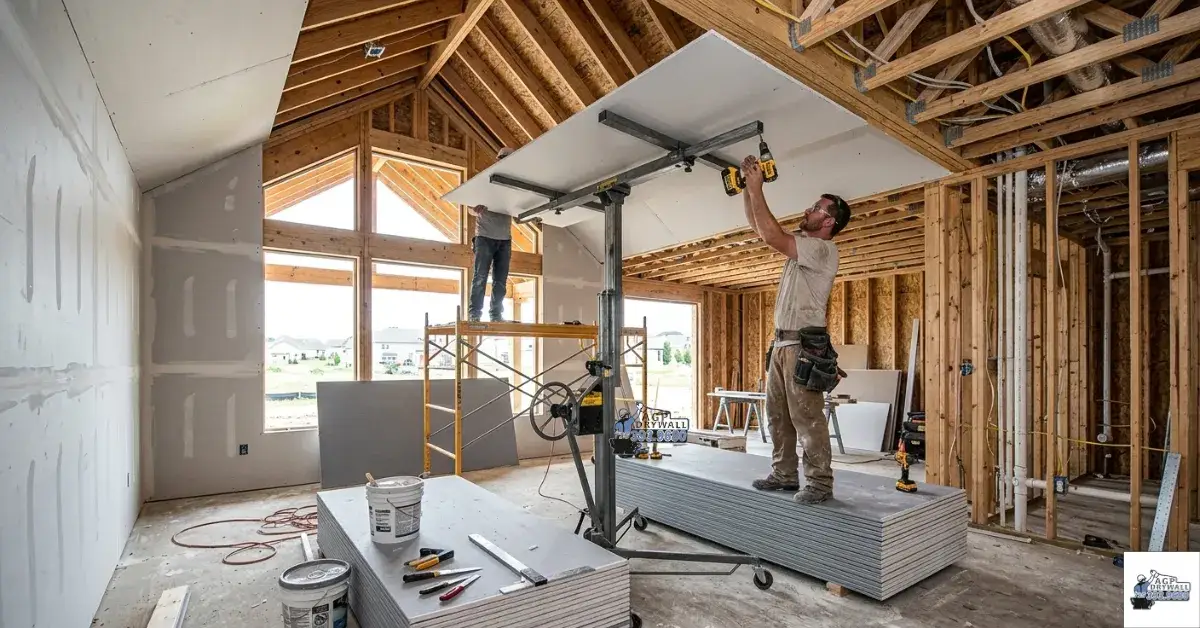
Cutting and Hanging Drywall Sheets
Once the room is ready, drywall sheets are cut to fit walls and ceilings. Using a utility knife and T-square ensures precise cuts for corners, doorways, and windows. It is always better to cut slightly smaller than needed, as drywall can be adjusted for a snug fit.
Hanging drywall requires careful lifting and alignment. Ceiling sheets often need extra hands or a drywall lift to hold them in place securely. Starting from the top and working down ensures the seams align neatly. Fastening screws or nails into studs rather than the drywall itself prevents sagging over time. Properly hung sheets create a seamless foundation that makes finishing work faster and more professional.
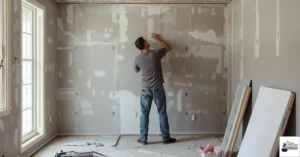
Taping and Finishing the Seams
After the sheets are in place, the seams between them are covered with joint tape and compound. This step is crucial for achieving a smooth, polished surface. Using a drywall knife, apply the first layer of compound over the tape, then allow it to dry completely. Multiple layers may be necessary, each applied slightly wider than the previous to blend the seams seamlessly.
Sanding between layers ensures an even finish, but homeowners should avoid over-sanding, which can damage the drywall surface. Dust control is important during this step, so wearing a mask and covering nearby furniture is recommended. With careful taping and finishing, walls will appear continuous and flawless, ready for paint or other decorative treatments.
Sanding and Surface Preparation
Sanding is often the most tedious part of residential drywall installation, but it cannot be skipped. Smooth walls are essential for a professional look, especially if you plan to apply textured finishes or bright paint colors that highlight imperfections. Fine-grit sandpaper or sanding sponges work best for achieving an even surface.
After sanding, cleaning the walls to remove dust ensures paint or wallpaper adheres properly. This is also the time to inspect corners and edges, touching up any areas that need extra compound. Homeowners will notice the difference when a well-prepared surface reflects light evenly, giving rooms a clean, high-quality appearance.
Common Considerations for Homeowners
Choosing the right materials and tools for drywall installation for homes is key. Lightweight drywall can make handling easier, while thicker sheets offer better soundproofing. Consider room function, humidity levels, and structural requirements when selecting the type of drywall.
Proper installation techniques also matter. Using consistent screw spacing, aligning sheets carefully, and keeping seams tight reduces the risk of cracks or gaps later. Patience during taping and sanding pays off in a visually appealing finish that enhances the overall value of your home.

FAQ
What is the average cost of residential drywall installation?
Costs vary depending on room size, drywall type, and labor. On average, homeowners can expect to pay between $1.50 and $3.00 per square foot for drywall installation for homes.
How long does residential drywall installation take?
The timeline depends on project size and crew experience. A standard room may take one to three days, including hanging, taping, and sanding.
Can I install drywall myself at home?
While DIY installation is possible, achieving professional results is challenging. Many homeowners hire skilled installers to ensure seams are smooth and surfaces even.
What are the benefits of using high-quality drywall?
High-quality boards reduce cracking, offer better insulation, and provide a smoother finish for painting or decorating.
How do I maintain drywall after installation?
Keep walls clean with a soft cloth, avoid excessive moisture, and touch up minor marks with paint or drywall compound when needed.
Conclusion
Residential drywall installation is more than just attaching panels to walls; it is a precise process that sets the tone for your entire interior. From preparation to finishing, every step matters in creating smooth, visually appealing walls and ceilings. Proper planning, careful hanging, and meticulous taping ensure a long-lasting finish that enhances your home’s comfort and value.
For homeowners looking for reliable and professional drywall solutions, AGP Drywall Residential offers experienced installation services tailored to your specific needs. Investing in skilled installation not only improves aesthetics but also provides a durable foundation for years to come.
